Sanity Check: Set up a student-friendly grading status board using Trello
This is the first in a weekly series of articles here that I call “Sanity Check”. I hope to post Sanity Checks every Tuesday, with articles on profhacks, tips on productivity and wellness, and ways for professors (and teachers of all sorts) to save time, get stuff done, and be happy.
Part of good course design as we start a new semester means considering how to give feedback to students. “Feedback”, of course, means a lot more than just grading. It means giving students information they need, when they need it, in a usable form. And one of the most in-demand items of information for student during a course is how soon you’ll be handing back graded work.
Unfortunately, we often end up giving students info about the status of graded work from a reactionary position. We get those emails or before/after-class questions — Are you done grading my paper? When do you expect you’ll have those tests graded? Wanting to know when you’ll be done grading a piece of work is a legitimate request from a student, but when you get dozens or hundreds of those requests one after the other in a short period of time, it gets burdensome to say the least.
A couple of years ago I stumbled upon a way to give students this information on demand, without a single email or question involved, and it helped me keep more organized and forward-looking with my grading schedule in the process. It involves a fantastic web tool called Trello.
What is Trello and what does it have to do with grading?
Trello is a tool that is so simple and universal it’s hard to describe exactly what it is, because it can be used in so many different ways. At its heart, Trello is an organizational tool that uses the kanban system of organization and project management, used in Japanese corporations, to visually arrange items in the form of cards that are placed into vertically-oriented groupings called lists. The cards can be moved from one list to another, like post-it notes arranged on a whiteboard. Trello boards can be used for everything from tracking progress on software development projects to planning your wedding or keeping track of reading lists. Trello maintains a whole page of example boards for inspiration you can browse to see what’s possible.
I’ve been using Trello to keep track of grading tasks in my courses for some time. One day I realized that the information on my grading task board is precisely what students were asking me for (sometimes over and over again). So I decided to clean it up and release it to the public for everyone to see, under the name of the Grading Status Board. Here’s what it looks like right now, on the eve of the beginning of Winter semester (click here to see it live):
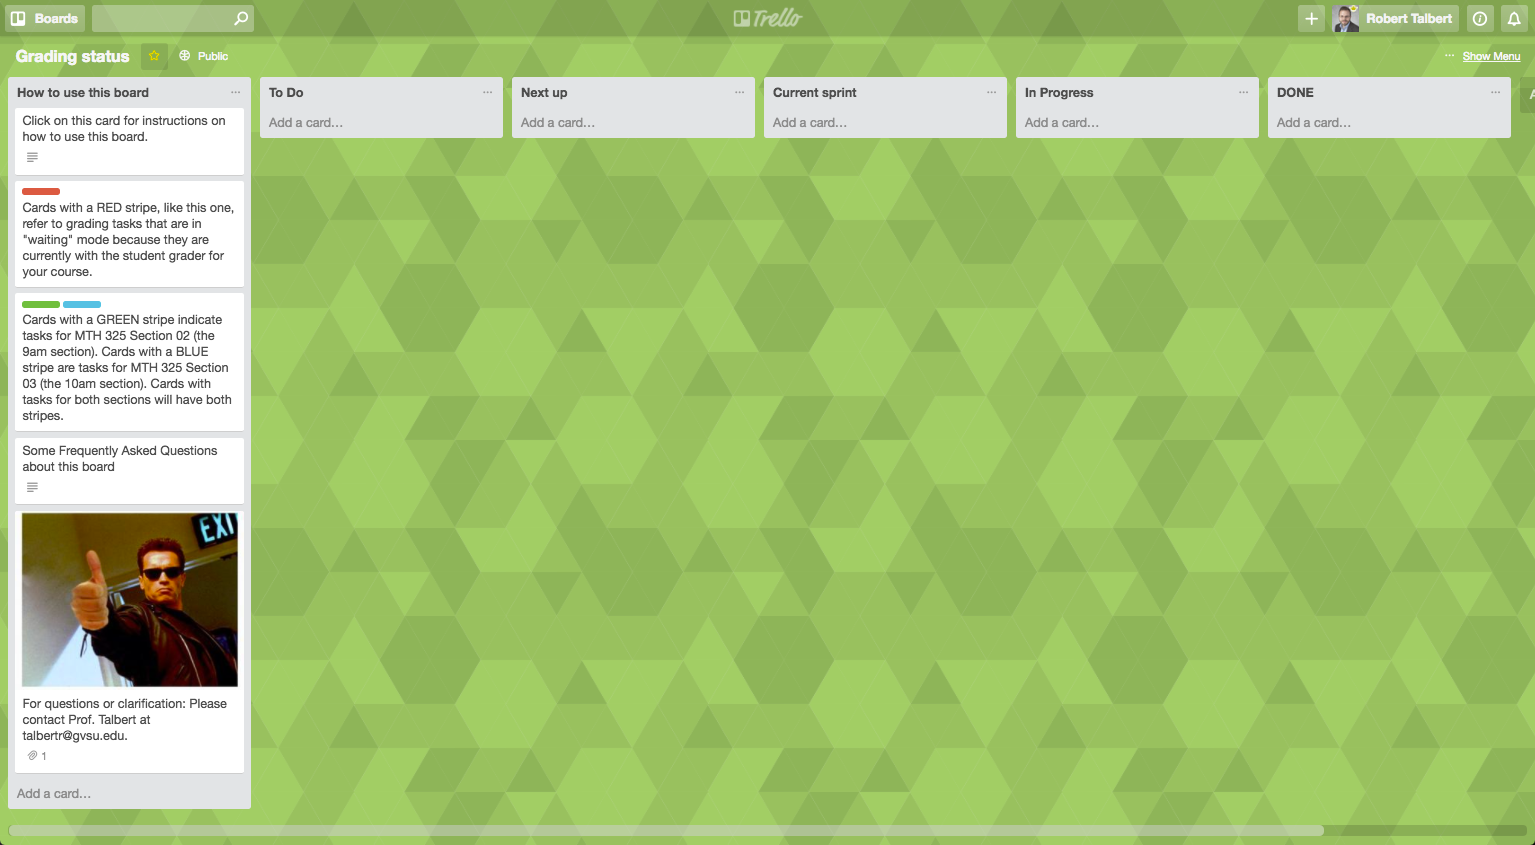
There’s nothing on it of course, because there’s nothing to grade right now. (I’ll look back on this time with great fondness later.) But note the structure, with lists for How to use this board, To Do, Next Up, Current Sprint, In Progress, and DONE. As the semester progresses, each item that I grade ends up on this board as a card, and it makes its way from To Do to DONE, and my students and I can get a visual map of its status at any time.
If you go to the actual board, look in the information list and click on the top card, it “flips over” and there are instructions on how to use the board:
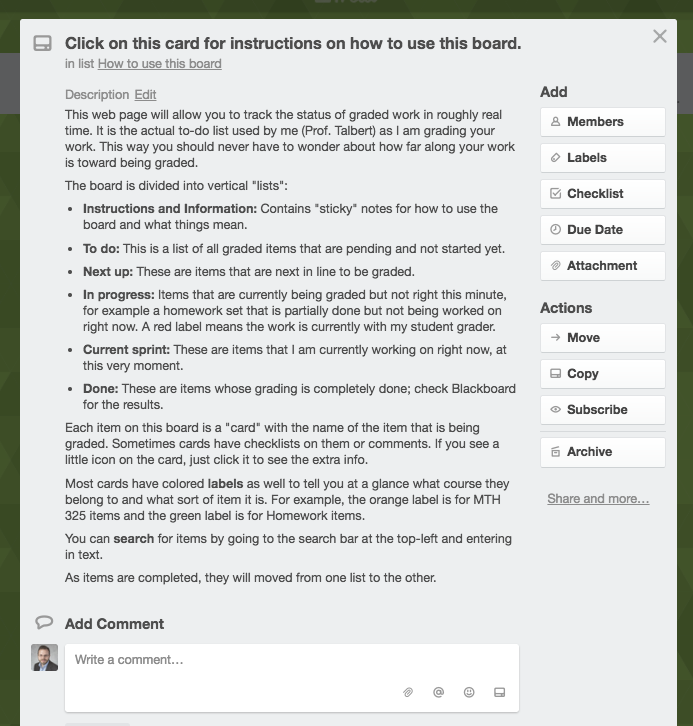
Those instructions tell you (and my students) everything they need to use the board. Graded items are cards that start off in the To Do list, then get moved to the Next Up list when they are the next in line to be graded. They then move to the Current Sprint list when I am working on them, and then to the DONE list when they are done or to the In Progress list if they are underway but not done.
I give the URL for the grading status board out on the first day of class (it’s linked to our Blackboard site). Whenever a student wants to know the status of a piece of work, they just look at the board, and it’s a live look at where it is. I tell students it’s like the UPS package tracking system, except for their grades. Students can get this information anytime, anywhere (Trello has great mobile apps) and professors don’t have to deal with answering the same question about grading status over and over again.
How to set up a grading status board
Now I’m going to give you step-by-step instructions for setting one of these up for yourself.
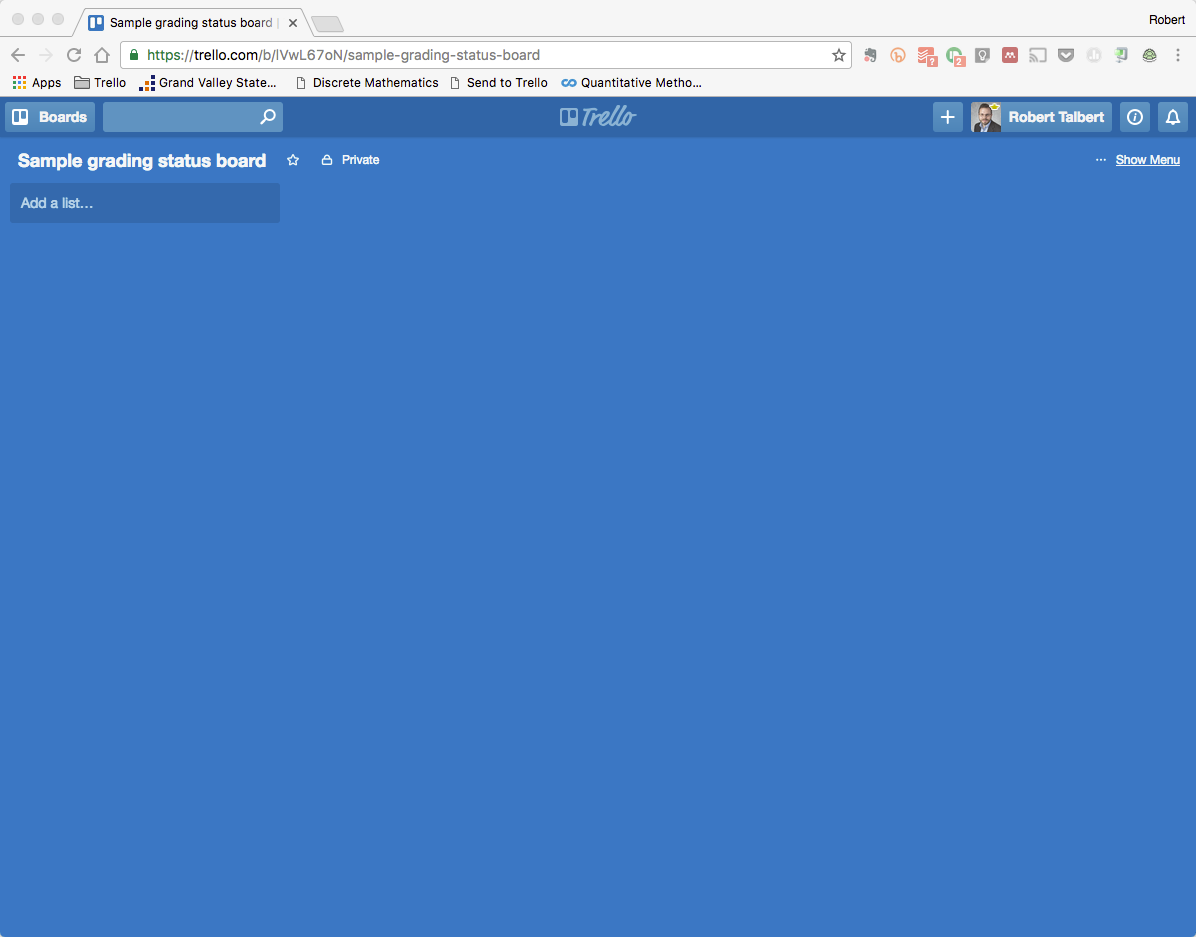
First, go to http://trello.com and sign up for a (free) account. You can just sign in using Google if you prefer, or enter your email and a password. Once you are in, create the board and call it “Grading Status” or whatever you like. It will look blank, like this:
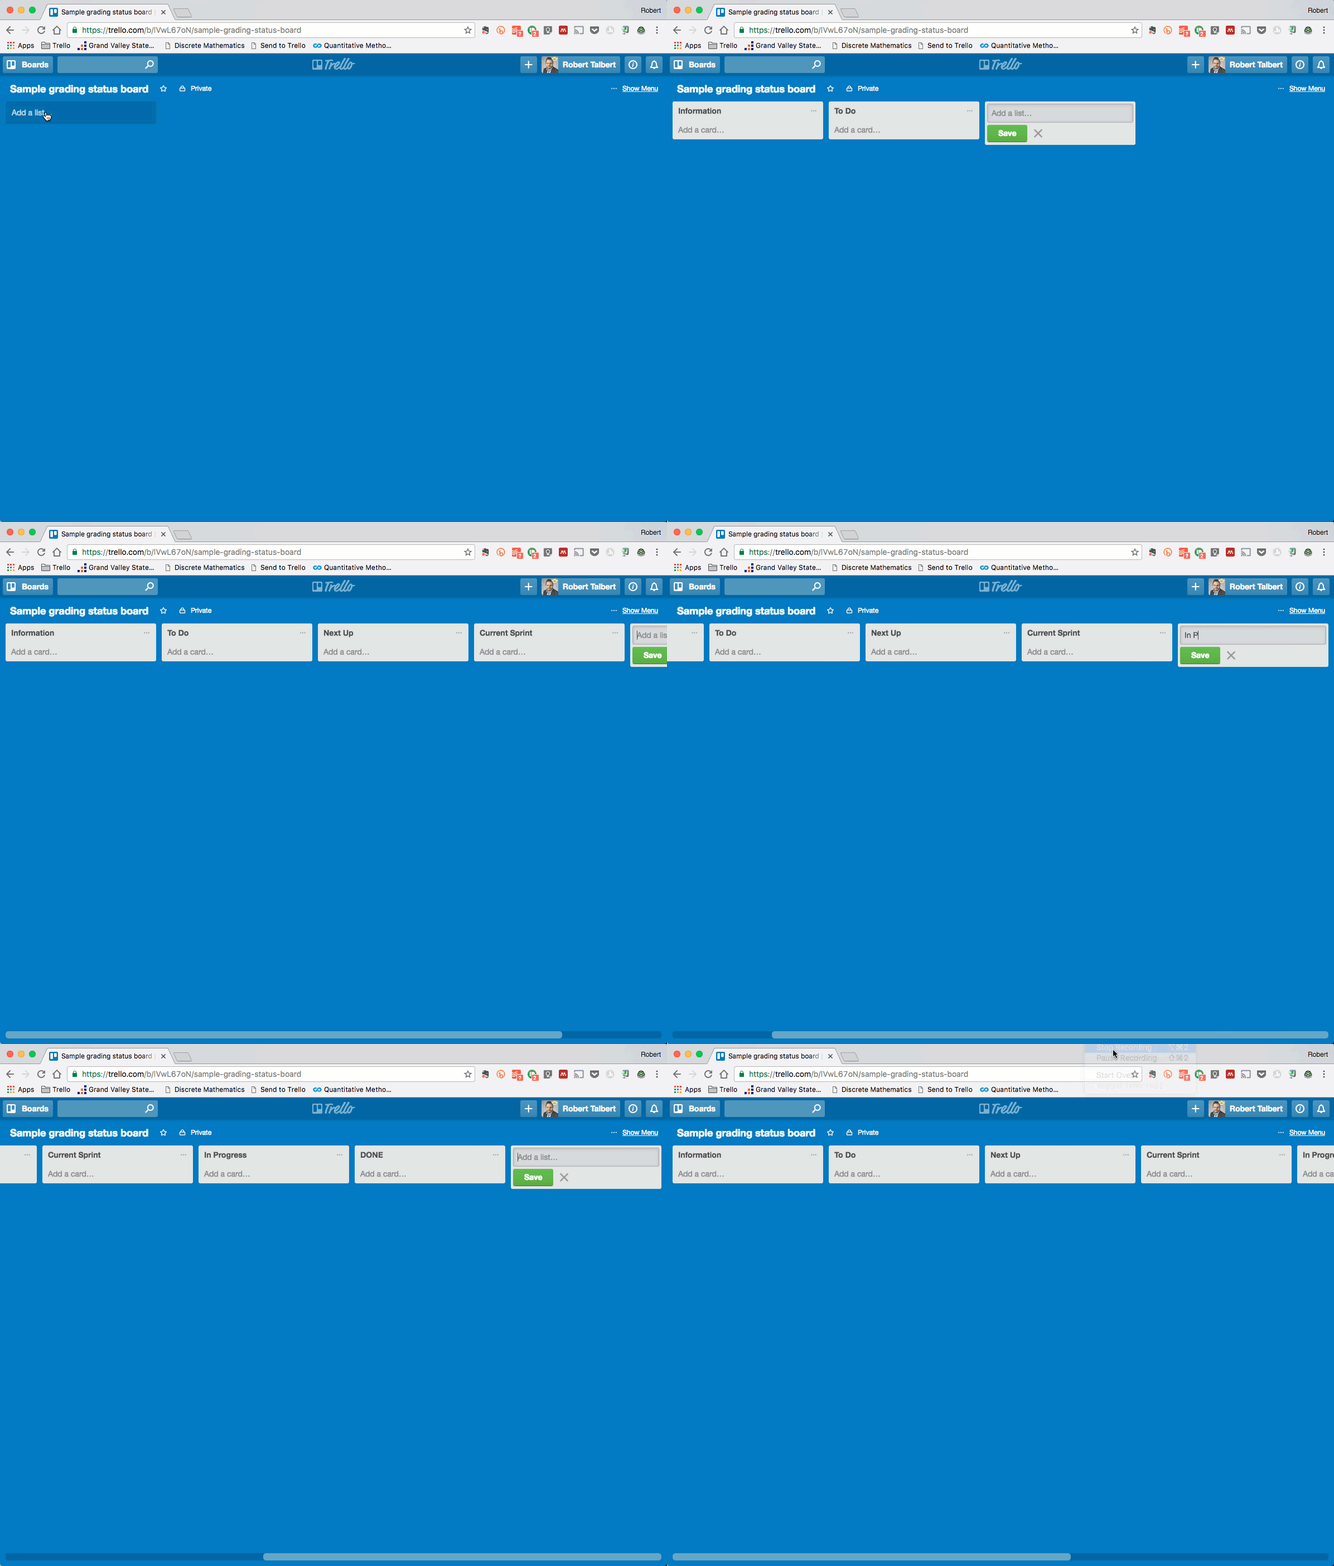
Now we’re going to create six lists: Information, To Do, Next Up, Current Sprint, In Progress, and DONE. Make sure to arrange them in that order from left to right (although some people like to put the Information list at the far right; suit yourself!). You can click and drag lists to reorder them:
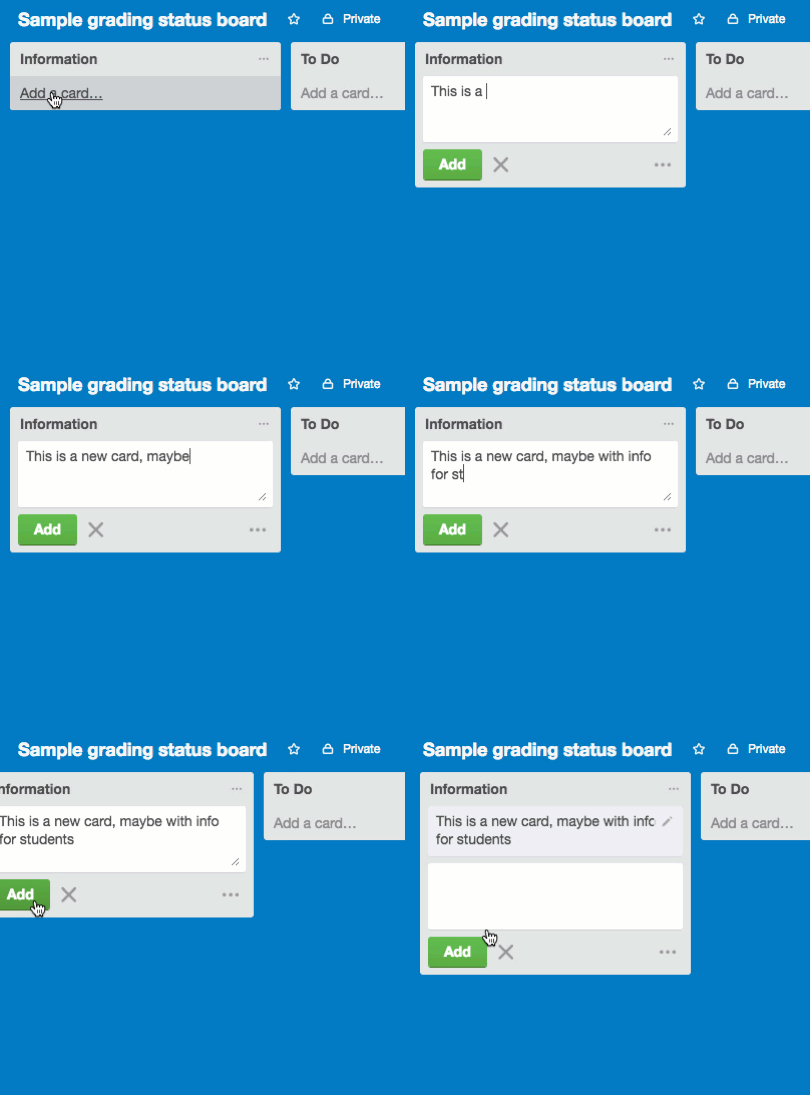
Now we add cards to the lists. To create a card in a list, just click on “Add a card…” in the list you want and start typing, then hit Enter or click Add when done:
A big strength of Trello is the ability to add information and “stuff” to cards. Clicking on the card will flip it over and there you can add information. For example, here I’ll add a description (the text field uses Markdown, which is another reason to like Trello) and attach a file.
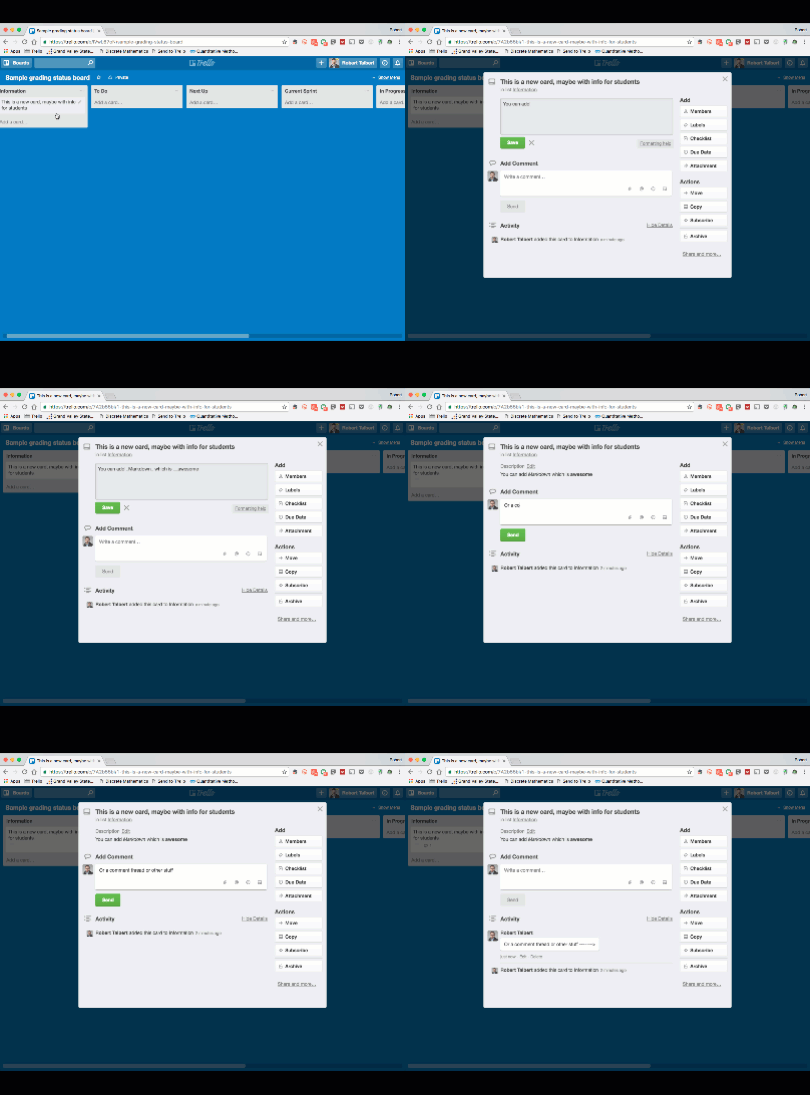
You can also attach pictures and files to cards after you create them, just by dragging and dropping onto the card.
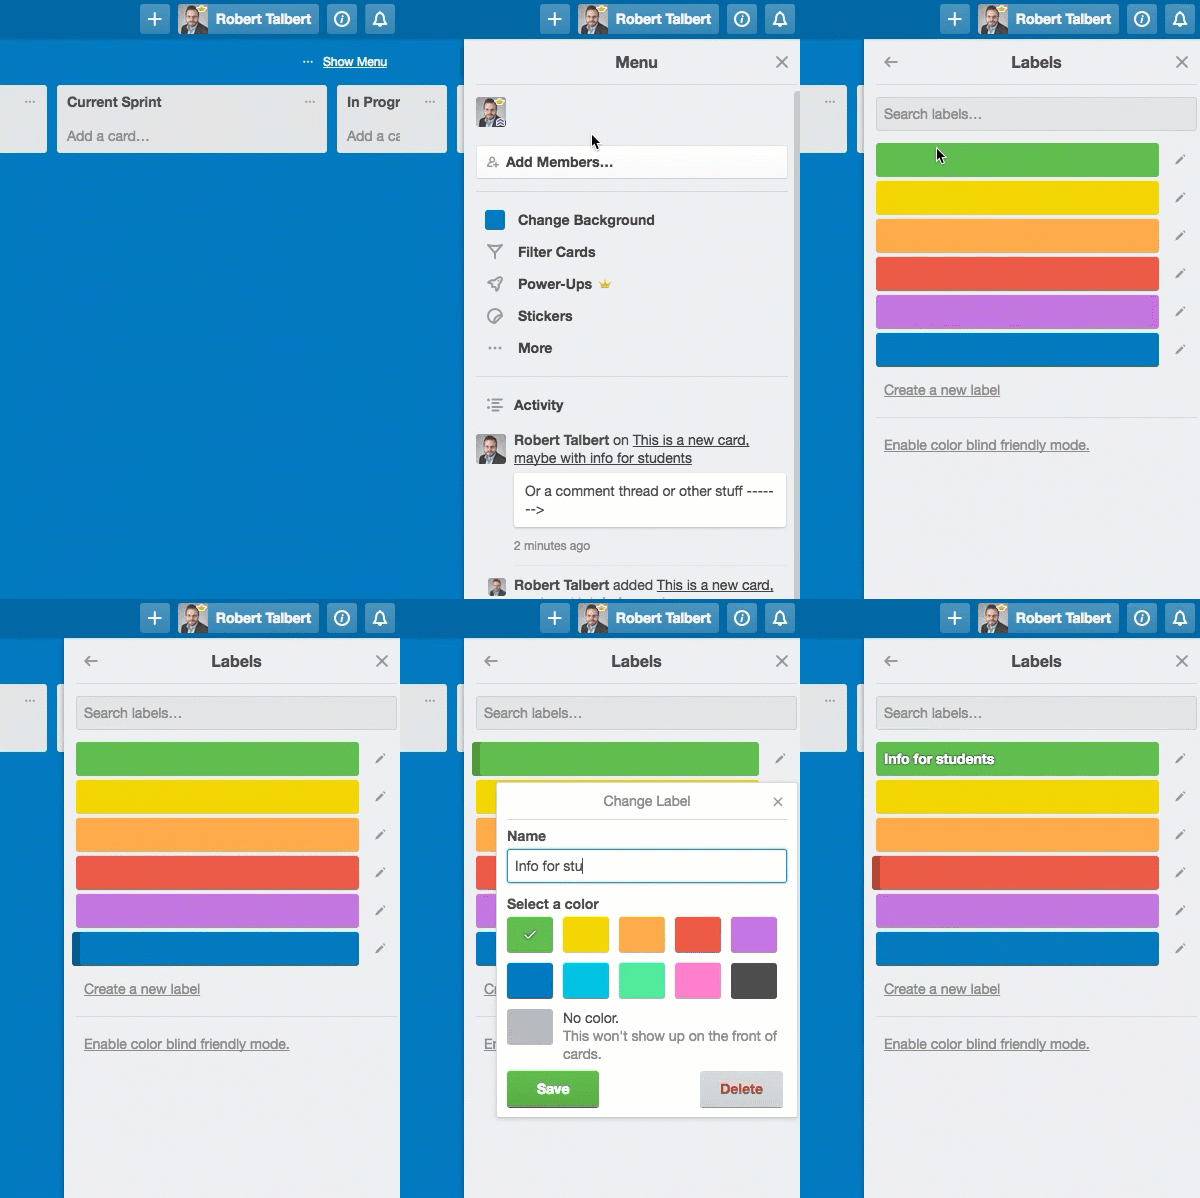
Next, I find it helpful to create labels that add some metadata to the cards. I create a different label for every section that I am teaching, along with a red label for cards that are currently with my student grader so students will know I don’t have them. You can create labels by going to the menu in the top right of the board:
For now, you can add cards to the Information list that students will use to navigate the board. Later, as graded work comes pouring in (sigh…) create a new card in the To Do list for each item to grade. Here’s a workflow that I recommend that will make your life easier in this regard.
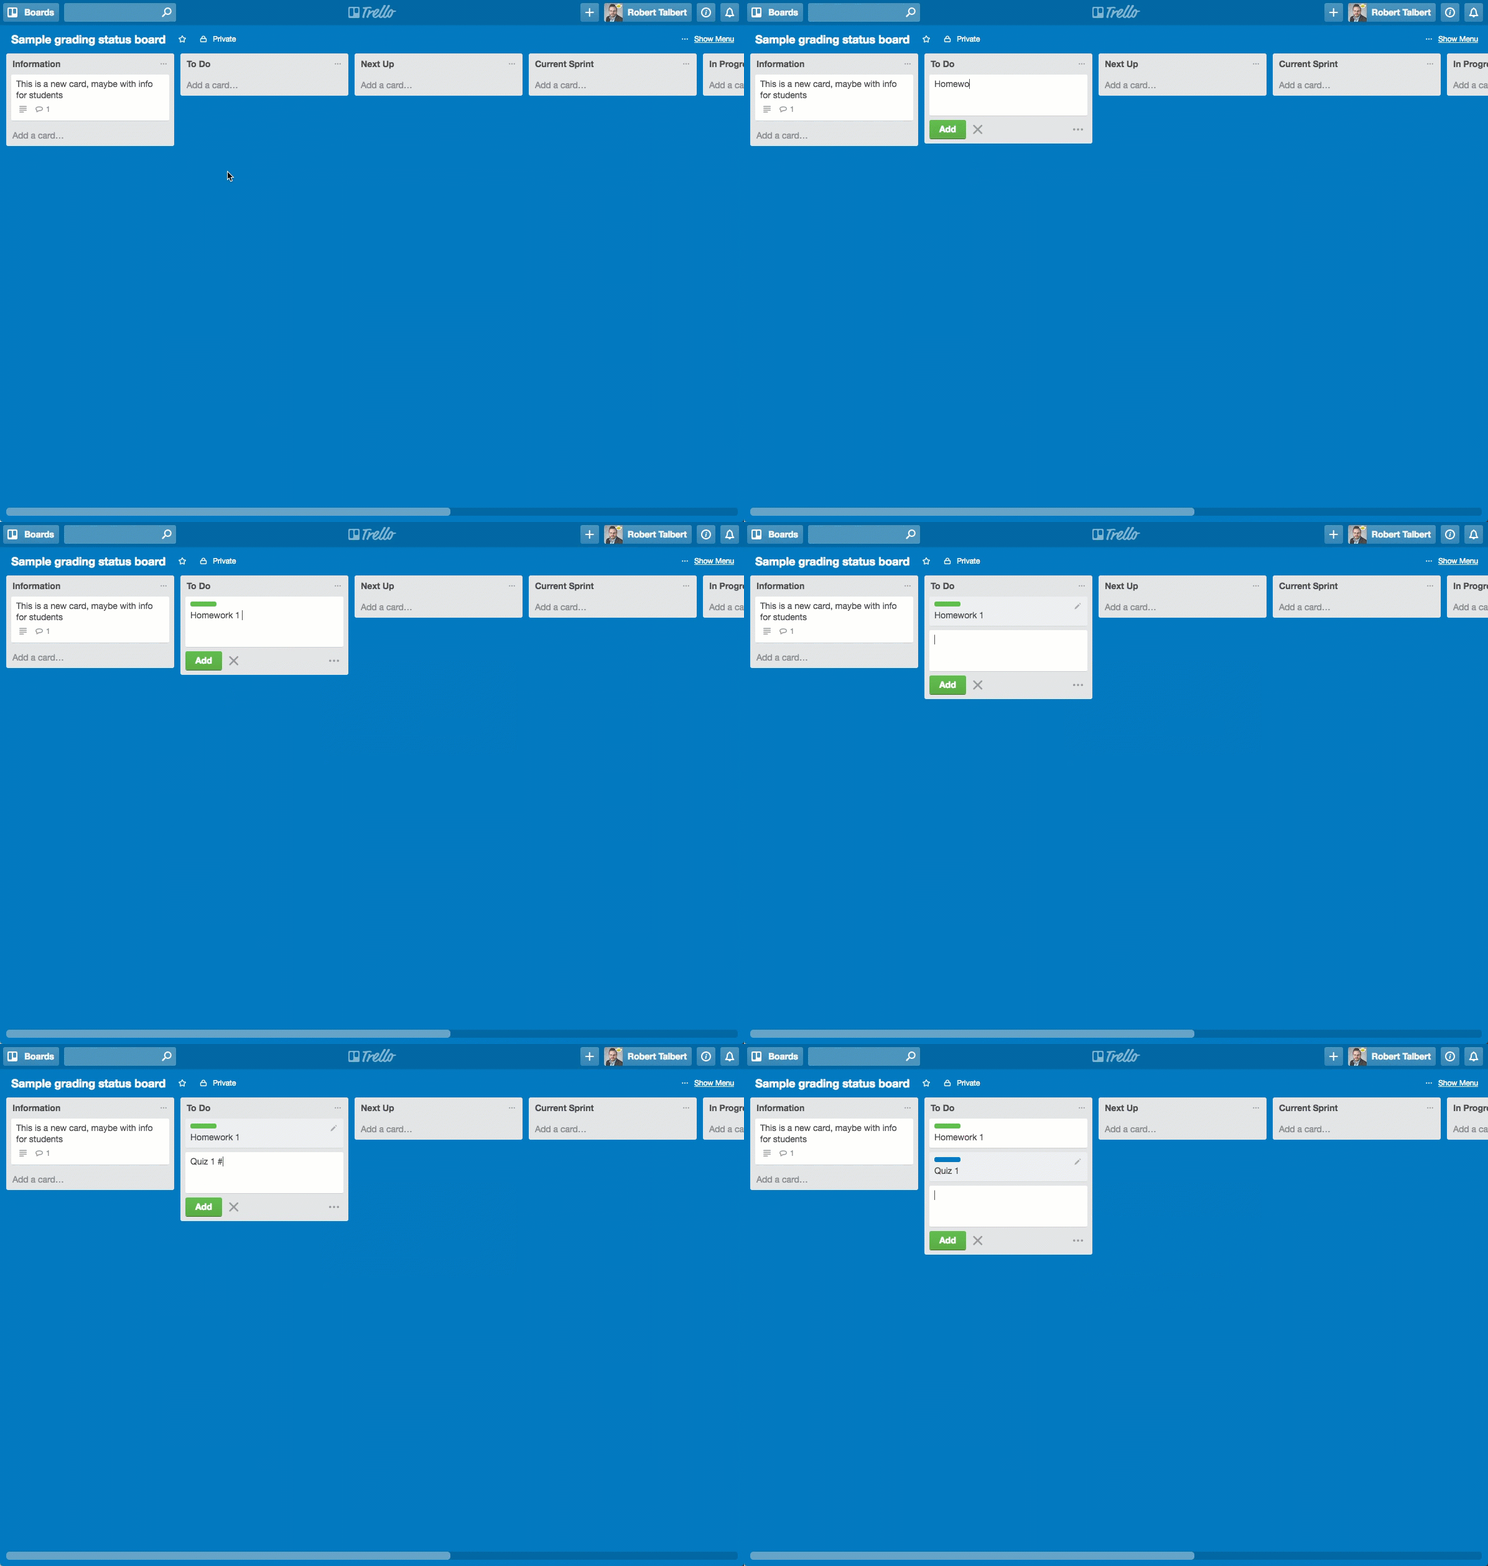
First, create the card in the To Do list and type in the name of the item you are grading. You can also add labels to the card when you make it by using the hashtag symbol. Here’s an example of creating a bunch of these cards. In this example, I’ve created labels for “MTH 101 Section 1” (green) and “MTH 102 Section 2” (blue).
And now a very important step: If the graded item is big, break it down into small pieces by adding a checklist to the card. One mistake a lot of professors make in grading is thinking that a graded item like “Quiz 1” is a single item on a to-do list. But it isn’t. Grading a quiz, test, writing assignment, etc. is not a task, it’s a project — a sequence of related (and smaller) tasks that can be done piecemeal if needed.
For example, that “Quiz 1” that I added to the board might be for a class with 75 students in it. If I conceive of that quiz as a single task, I’ll struggle to get it done because my brain rebels against the idea of the amount of time and effort it will take. Instead, what I should do is break that into a bunch of discrete tasks each of which can be done in a reasonable amount of time.
Trello makes this decomposition of grading tasks easy by allowing you to add checklists to cards. Here for example is me adding a checklist to the Quiz 1 card that represents one way to break up the project into tasks (by groups of last names):
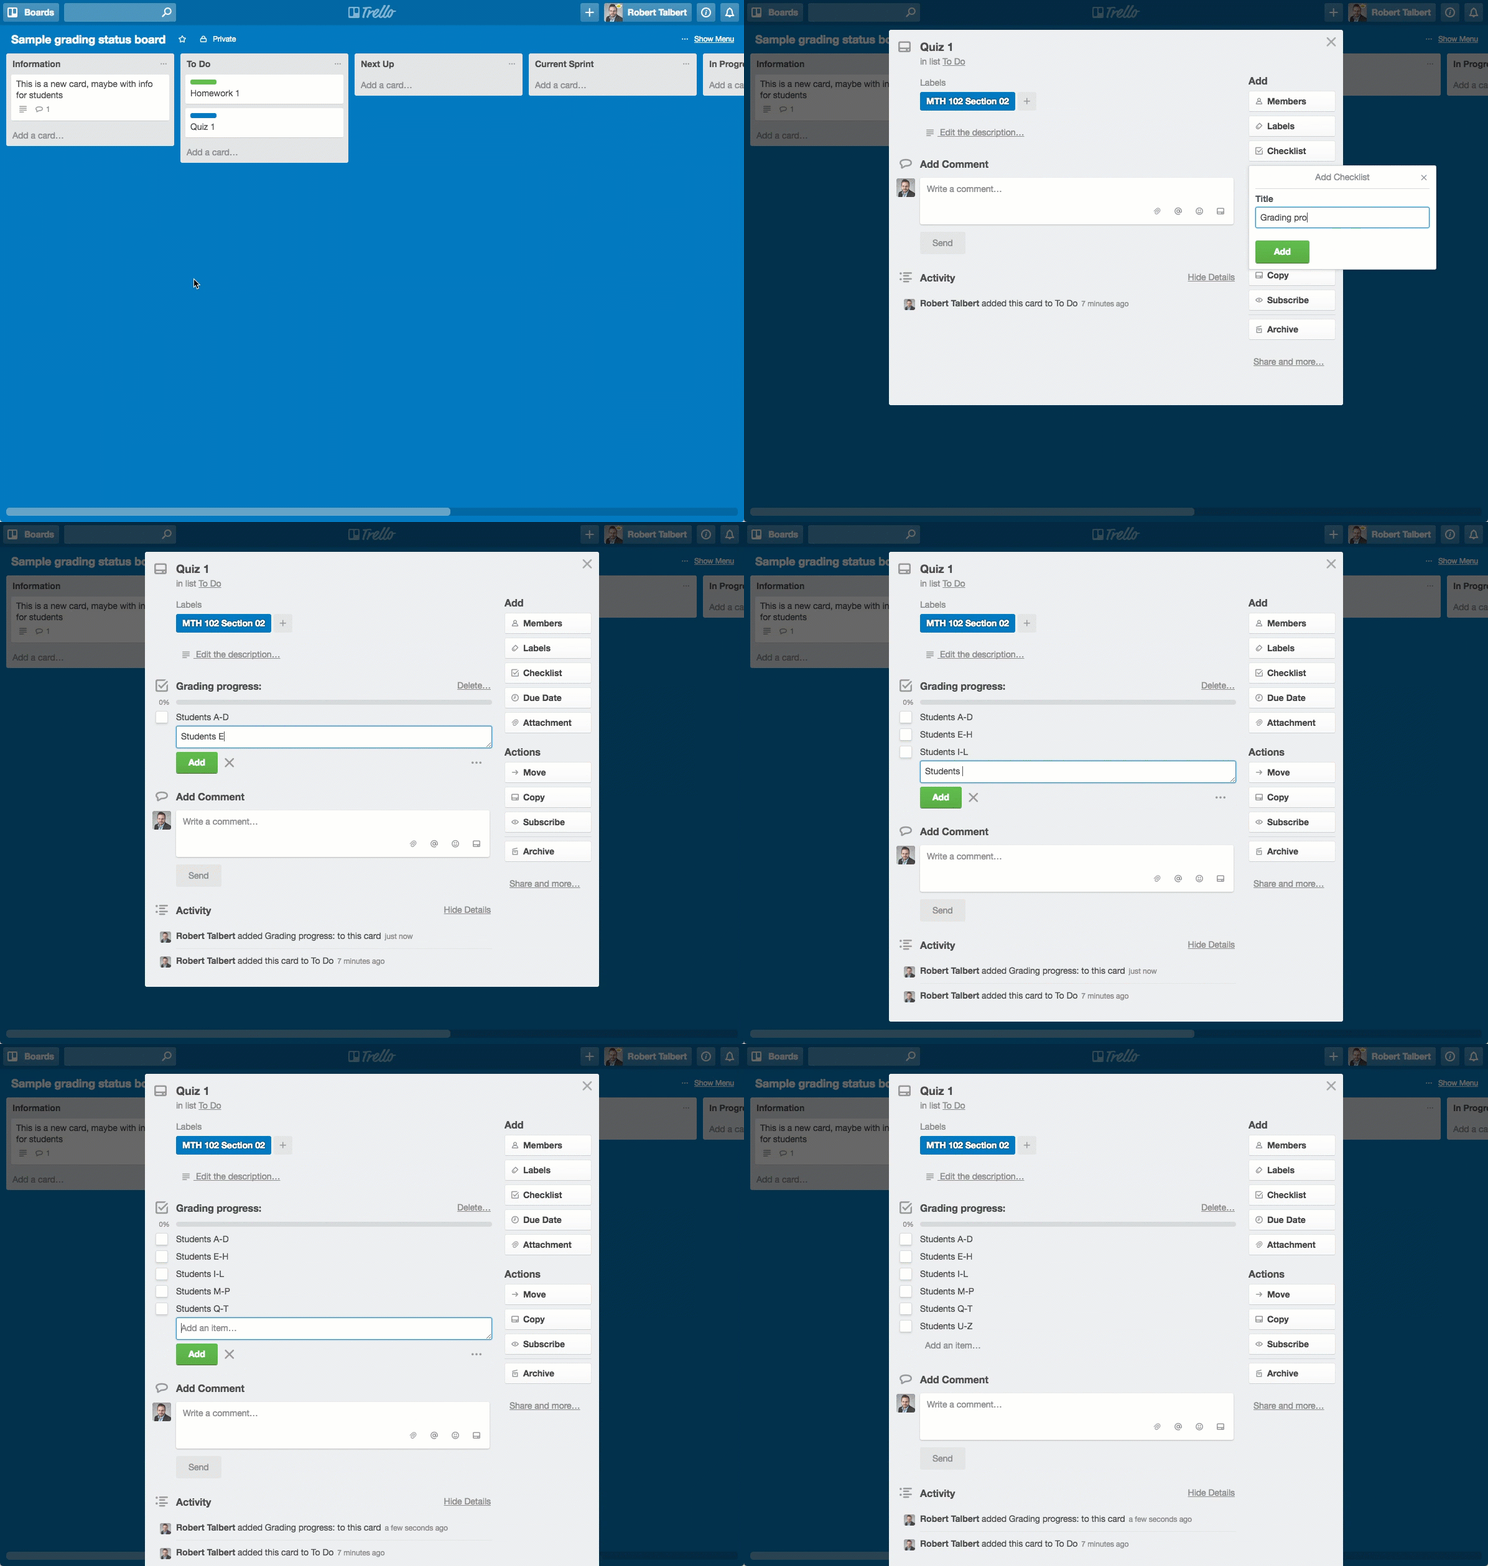
As you grade the quiz, if you only have time to grade one clump of students, then go ahead and get that done — then check the box on the card to show you’re done. On the front side of the card, it will show that there’s a checkbox and how many tasks have been checked off.
Treating grading tasks as projects and not tasks, and then breaking these down into manageable chunks of grading is probably the biggest single sanity-saving hack I’ve discovered in the last 10 years of teaching because I can use smaller windows of time, and commit to small windows over a few days rather than staying up late or working on the weekends because that’s all the time I think I have.
You have now built your board and populated it with stuff to do and information on how to use it. The last thing to do is set the visibility to “Public” so that your students can see it.
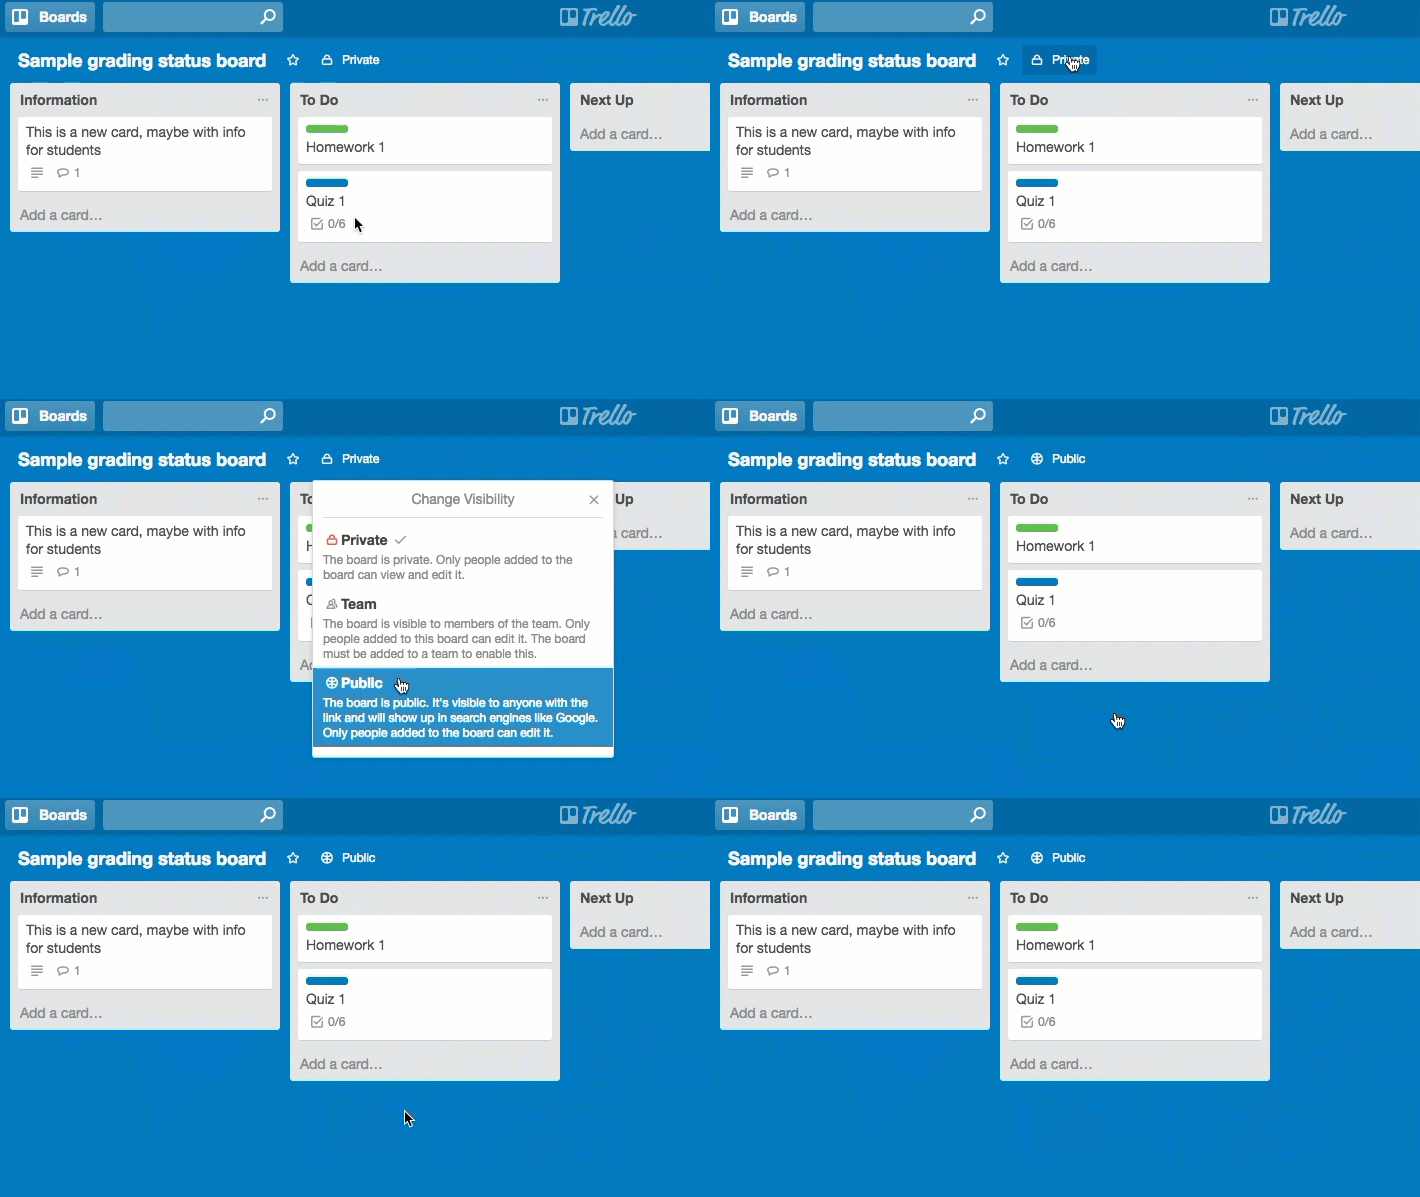
Then you just give out the URL to students.
How to use the grading status board
Here’s how you can use this board, based on how I use mine:
- Remember to add new items to the To-Do list when they come in.
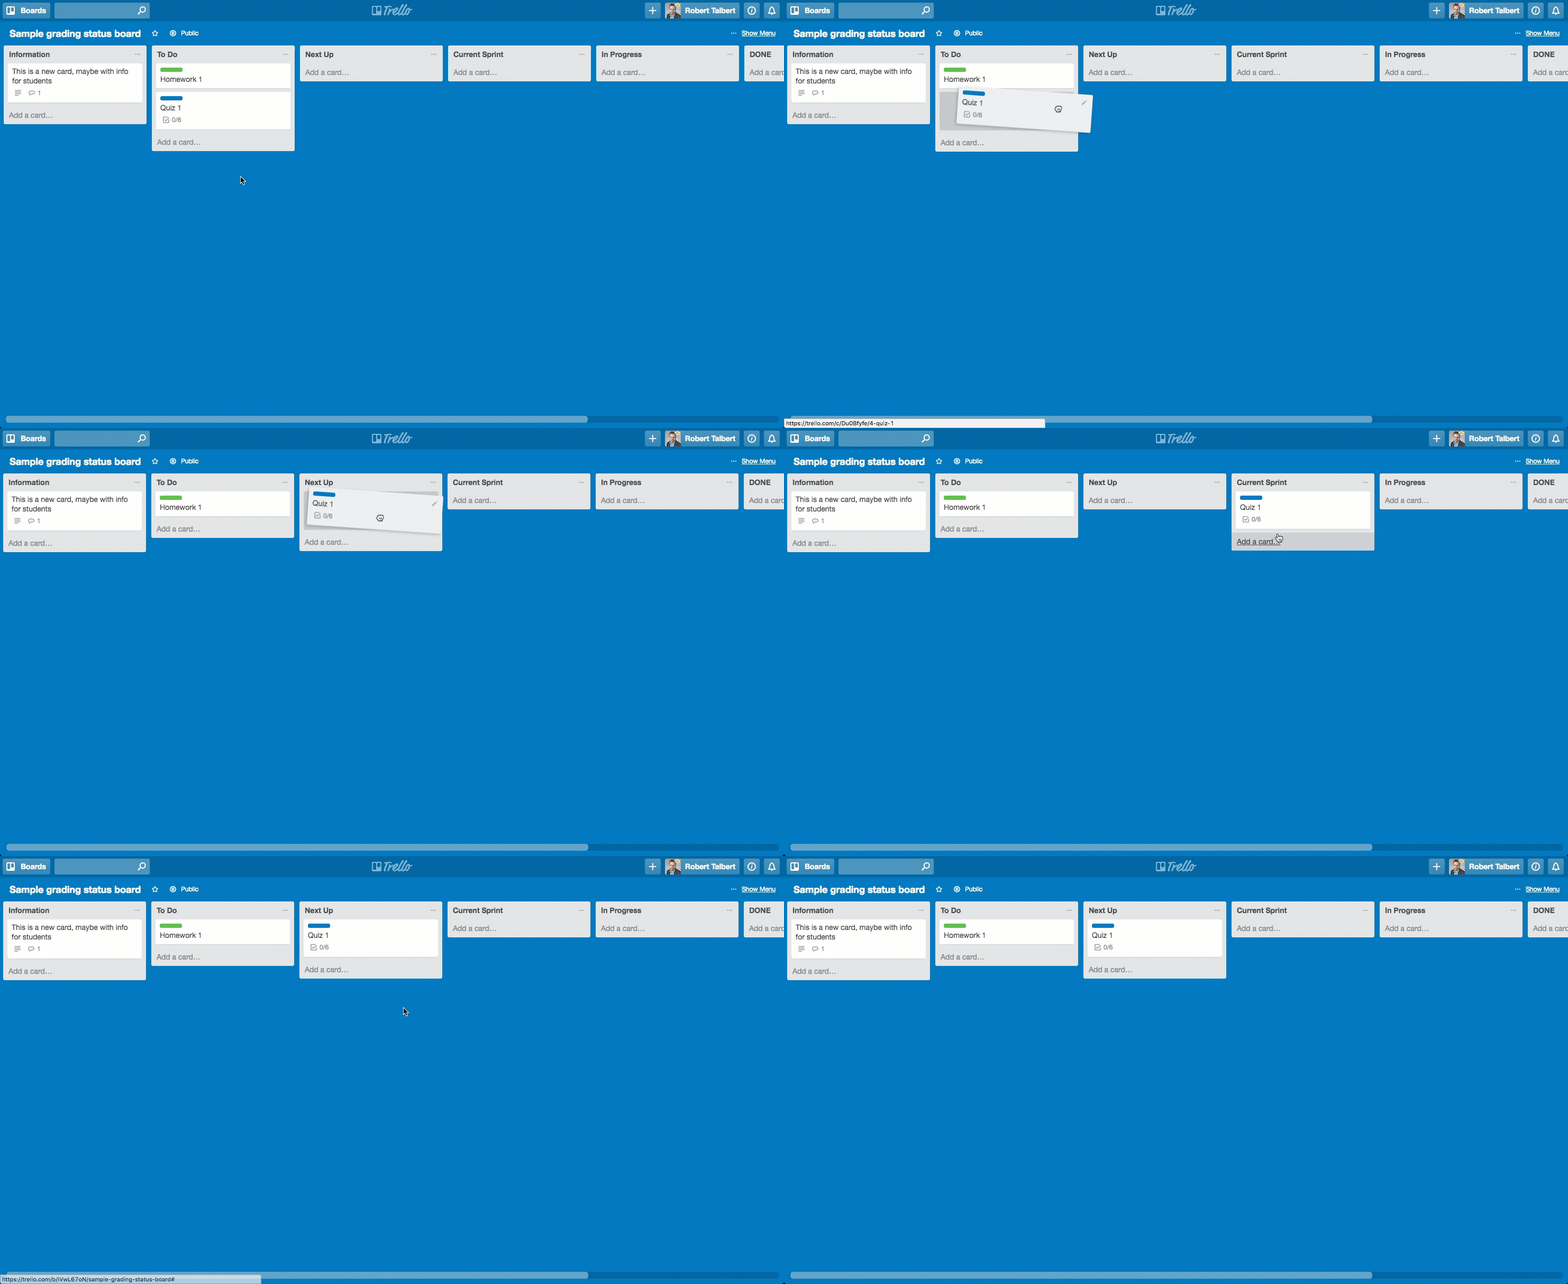
- On a regular basis (e.g. daily), look at the to-do list and decide on the 1–3 items that you intend to do next, and then move them to the Next Up list if they aren’t already there. (You do this just by clicking and dragging the card from one list to the other.) Only have 1–3 items in the Next Up list at any given time. This helps you focus on next actions, rather than get bogged down in the giant backlog of stuff to do.
- When you are working on a single specific item, move it to the Current Sprint list. This is the place for items you are working on at that very moment.
- As you grade, check off the subtasks in the checklist for this item as you complete them, if the item has a checklist.
- If you make progress on an item (say you grade students 1–30 of that 75-student class, but not everyone) but have to quit grading before you are completely done, move the item to the In Progress list, which is for items that are underway but not done yet. Move it back to the Current Sprint list when you resume working on them. (Most graded items will bounce between these two lists for days until they’re done.)
- Optional: You can click on the card to leave a comment for students about its current status if you feel students may need more info.
- Once you finish an entire item, move it to the DONE list and celebrate!
- Repeat this during the semester, adding new items to the To Do list, populating the Next Up list, etc. throughout the week.
Here’s what it looks like to move cards from one list to another. You just drag and drop. The syncing on Trello is virtually instantaneous, so anybody who has the board open on their browser or phone will see the card move almost as soon as you move it:
Make sure to give the link to your grading status board out to students on the first day of classes and take a minute to explain or demonstrate it. I put the link for mine prominently on the course Blackboard site. And if a student forgets and sends you an email or catches you after class to ask whether you’re done grading something, just ask them, “Did you check the grading status board?” Sometimes students may need help understanding it; others have just forgotten that it’s there, and need reminding.
My students and I have found the grading status board to be a great time-saver and organizational tool. For me, I use the grading status board as my actual grading task list; I have an IFTTT automation set up that creates a task in ToDoist whenever I add a card to the To Do list on the board. For students, they benefit from real-time updates on your progress — their view will sync almost instantly with yours, so they’ll even “see” you move cards around — and that’s one less thing for them to think about, and a little more mental space to devote to learning the concepts in your course.
I encourage you to give this a try this semester, and I hope it helps your sanity if you do.
Questions?

Leave a Comment