GTD for Academics: Simple Trusted System

This is part 8 of an ongoing Tuesday Sanity Check series on Getting Things Done (GTD) for Academics. You can find the first seven posts here: Setting the Stage, Engaging the System, Acquiring the Habits, Collect, Process, Planning, and Doing.
So far in this series, I have stressed that Getting Things Done, GTD, is a system for making intelligent choices about what you should be doing and what you should not be doing at any given point in time. It is predicated on some basic habits: Collecting, Processing, Planning, and Doing. These four habits form the core of what Leo Babauta calls “Mimimal ZTD” in his Zen To Done system. These habits, when done consistently, add up to a dramatic improvement in productivity and peace of mind. Although it can be hard work to build those habits, it’s not rocket science, and anybody — even college professors — can do it.
One mistake a lot of new GTDers make is in thinking that GTD is not about these habits or about behavioral change, but about tools — apps, fancy notebooks, and so on. This is like saying that getting healthy is about having good exercise equipment. You can buy an expensive treadmills, but without the behavioral change and the consistent practice of basic habits, that treadmill will just collect dust and good health will seem elusive and complicated. GTD isn’t complicated. But if you try to practice it without the habits in place, it’s not likely to stick.
That said — if you are making an effort to practice the basic habits, there’s a lot to be said about having good tools. This post in the series is going to focus on the fifth habit in GTD and ZTD, the habit of using a simple trusted system for housing and managing information about tasks and projects. Having a good “tool stack” for using GTD is important for making the practices of collecting, processing, planning, and doing more fluid and frictionless, more a part of the way you think.
And by “good”, we mean simple and trusted. Use only the simplest possible tools needed to implement the basic habits, and use only tools that reduce the amount of time and energy you spend on those habits rather than the ones that add to that expenditure. The rule is that the best GTD tools are the ones you actually use.
What a good system looks like
At the absolute minimum, a GTD implementation should include:
- A calendar. As you collect and process your stuff, a lot of it will have a time and/or date constraint. Those items should go on the calendar, along with the times that you set up in the Planning stage every week to work on your Big Rocks and MIT’s.
- A collection of lists. Not a single, monolithic to-do list (which is not a good system) but lists, plural, that contain action items, “Someday/Maybe” lists, “Waiting For” lists, and other lists for the stuff that you process.
- A place to store non-actionable but useful information. Remember that in processing, we separate the actionable stuff from the non-actionable stuff. Actionable stuff goes on a list (above). Non-actionable stuff that isn’t to be deleted needs a home too, a place where you’ll always look and where you can search it up easily when needed.
Notice that none of these elements strictly requires the use of a computer. You can use plain paper calendars, spiral notebooks, and filing cabinets and have a highly functioning GTD system as long as the basic four habits are in place. However, in my view, using computer software is the way to go, because the computer tools tick off all the boxes above, and also because the idea of having all my tasks and projects in a single notebook that could be easily lost or destroyed totally freaks me out.
Whatever form your tools take, they must be
- Simple: The act of using the tool should be a nearly frictionless experience, and it shouldn’t take a long time to learn how to use the tool. For example, a hammer is the epitome of a simple tool. Hammers don’t come with instructions. Everybody knows how to use one intuitively. However, the flip side of this analogy also holds: Hammers don’t really do much besides pound things. While a creative person might find multiple uses for a hammer, at some point the job might be complex enough that they need to move up to a more complex tool. But even then, simplicity is important. For example, my power drill does stuff that a hammer doesn’t. It’s more complicated than a hammer, but it’s still pretty simple to use. The point here is that while simplicity is paramount, it’s also a moving target based on your needs and experiences. As you gain more experience with GTD, you can consider using more complex tools. But start simple and always keep “simplest possible tool” in mind as the main idea.
- Trusted: You should spend little to no energy thinking about the tool itself after you have it set up. That seems ironic when we’re in the midst of a long post about tools, but the whole purpose of a tool it to allow you to do more on the job for which you bought the tool in the first place. Example: Around here in Michigan, it snows a lot. I have a tool, a snowblower, that helps me get the snow off my driveway. I need to be able to trust my snowblower. That means that when I’m using it, I want to focus on getting snow removed, not on whether the snowblower is functioning properly. And I do not ever want to think about the snowblower when I am not using it, unless absolutely necessary. Similarly, once you get comfortable with GTD tools, whatever they look like, they should fade into the background and stay there, occupying close to zero of your mental space.
A point to go along with that last sentence: Don’t spend a lot of time jumping around from one tool to another. Experiment, but eventually pick a tool and stick with it. This is hard for me, because I am constantly trying out new apps and services and dealing with an ongoing sense of digital FOMO. But in the end, I find I’m a lot more productive if I just stick with what works for me rather than expending insane amounts of time setting up my stuff in one app after the next.
My system: The basics
So now, let me try to explain the “tool stack” that I’ve set up to implement GTD.
Disclaimer What I’m about to describe might be way more complex than a new GTD person might be ready to handle. That’s OK and nobody should feel obligated to do things the way I do them. If you’re new to this, keep reading, but you’ll want to think about What subset or mutation of this guy’s setup would work for me? My setup isn’t perfect, and it’s undergoing constant evolution. But it’s the result of a long period of trial and error and it works well enough for me now — no more, no less.
The main components of my GTD setup are:
- Google Calendar, which I use as, well, my calendar. There’s nothing earth-shattering about how I use it. When stuff gets processed that is more of an event than a task, it goes on the calendar.
- ToDoist, which I use for managing my lists of actions. This is the heart of my GTD setup, and I’m going to go into mind-numbing detail on this in a second.
- Evernote, which I use as my digital filing cabinet. Anything that is not actionable but which is not to be deleted or delegated, goes into Evernote. That includes emails; stuff I clip off the web; scans of paper documents; files (sometimes); drafts of notes; and a lot of other stuff. I have quite a bit to say about Evernote and so I am going to make a separate post about it later, rather than make this one any longer.
I have a few ancillary tools that I use to help out, like Google Keep which I mentioned in an earlier post for capturing quick notes. But 95% of my operations use some combination of the three tools above.
ToDoist
ToDoist is the glue that holds my GTD together. At its core, ToDoist is nothing more than an app for making lists. It does one thing; but it does it so well, and has so many useful features, that it stands out in a crowded field of similar task management apps. I don’t think ToDoist is perfect, but I’ve tried many different to-do list apps and I keep coming back to this one because it really fits the way I want to work.
ToDoist is available on Windows, Mac, Android, and iOS and can be accessed through a web browser if all else fails. (This is one of the main reasons I use it.) It’s free to download, but some of the features I’m going to describe require the Premium version of ToDoist, which costs $28.99 per year. (Which I consider one of the better deals in all of paid software.)
Lists in ToDoist are referred to as Projects which is how we think of them in GTD. There’s no one right way to set up a Project list in ToDoist. You could have one monolithic list if you wanted, as a single Project. But in GTD it’s better practice to have one list per project. Within each project are the items in the list. We’ll refer to these as “tasks”, but in reality you could use ToDoist for any list at all regardless of what’s in the list. In ToDoist, there is one default project, the Inbox. But you can create as many of your own as you need in addition to the Inbox.
When you enter a task in ToDoist — which can be done in several ways, including a Quick Add feature that’s triggered by a keyboard shortcut — you type out the task itself, and then you can do several different things to it:
- Set a due date and time, using either a dropdown calendar menu — or by just typing out the due date and time, and ToDoist automatically reads it and converts it into a due date.
- Add a label, which is a piece of metadata attached to the task, by typing the
@symbol followed by the label text (for example@email). In David Allen’s GTD language, these labels are contexts that will help you filter tasks according to certain rules (see below). - Add a priority level, defined to be “level 1” (highest priority) to “level 4” (lowest), by typing
p1,p2,p3, orp4or clicking on a flag icon colored red (level 1), orange (level 2), or yellow (level 3). - Add a reminder, which will send you an email or a system notification or both, at either a certain time or when you enter a certain location.
- Add a recurrence so that the tasks repeats on a fixed cycle. Do this just by typing in the period of the cycle, for example “daily” or “every Monday, Wednesday, and Friday”. (ToDoist’s capabilities of understanding English are very impressive.)
- Add notes which can be text comments, or file attachments or links to external sources.
You can do all of these to each task, or none of them.
Every project in ToDoist comes with a unique email address, so when you are processing your email inbox, if an email contains actionable information, you can just forward it from your inbox straight into ToDoist. I only ever use the email for the Inbox project, but theoretically any project at all can have emails forwarded into it. This is an essential feature of to do list apps for GTD because it makes it totally easy to keep your email inbox at zero. A large portion of my processing habit consists of forwarding emails into ToDoist.
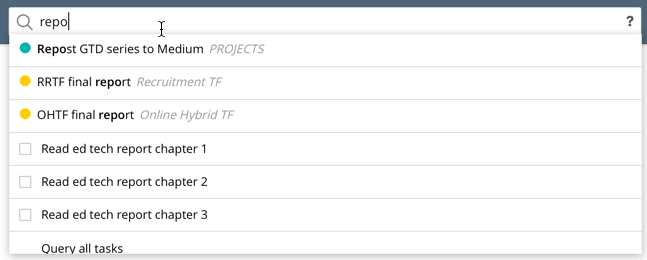
For me, what makes ToDoist so useful for GTD is its ability to search and filter the tasks that I’ve entered. There’s a search box on the ToDoist screen that can accept Boolean search queries. For example if I want to find all the tasks that have the string “repo” in them, I just type in “repo”, which will return not only tasks but also projects that have this string in them:
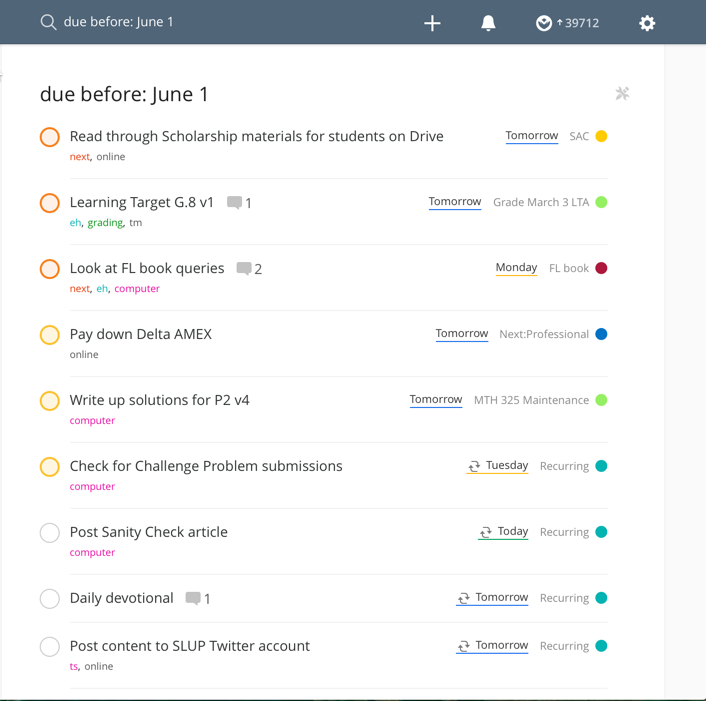
You can search using almost any data you’ve entered, including priority level, due date, labels, and project name. For example, I can search for all the tasks that are due before June 1 by typing due before: June 1:
I can search for all tasks that are either priority 1 or priority 2 and which have no due date by typing (p1 | p2) & no date:

I’ll say a little more about searching below. Suffice to say that the search syntax, described in full here, is simple and powerful for slicing and dicing your way through a big list of hundreds of things to do. Every search can be saved into what’s called a filter which are housed in anarea on the main ToDoist screen so you can implement common searches with one click.
ToDoist has lots of other features as well, like the ability to set up shared lists with other users and the ability to export tasks to Google Calendar. It’s well worth exploring once you’ve read this post.
My ToDoist setup
Now that I’ve described ToDoist in general, let me describe the particular way I have it set up.
First, I have five main project areas: NEXT, PROJECTS, Recurring, Future, and Someday/Maybe:
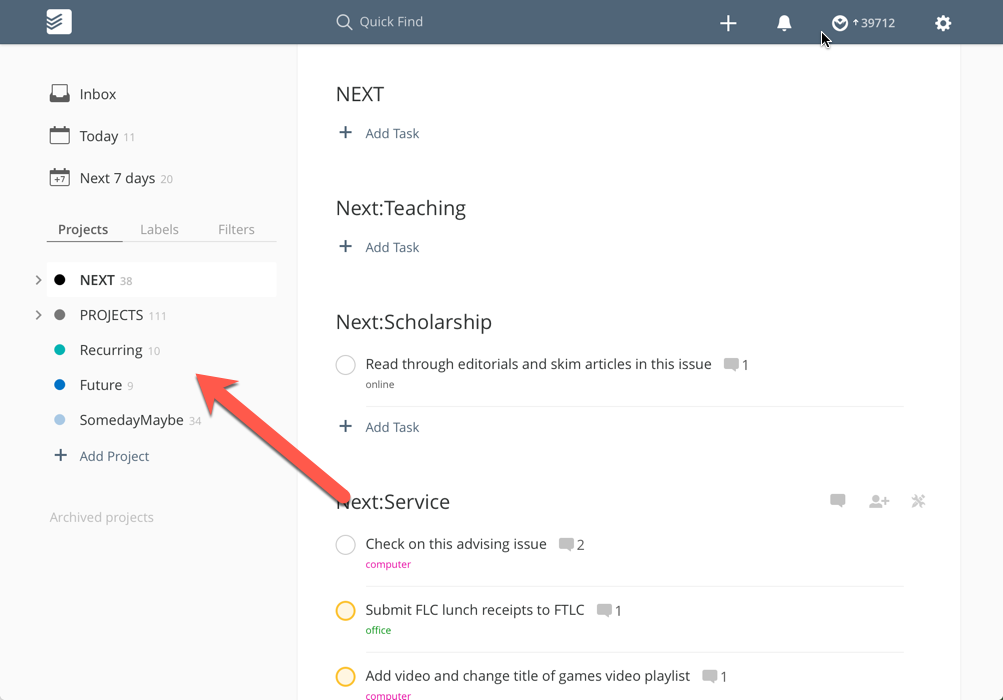
The last three are easiest to explain. Recurring is a “project” that’s just a list that holds any task that repeats. I find it convenient to have these in a separate space from non-repeating tasks because when I cross off a task from a project, I like to see it gone. Future holds tasks that I need to get done in the future but which don’t need attention yet; when I collect and process such a task, I enter it into Future and stick a reminder on it that gives me a notification at the point in the future when I need to start thinking about it. (This is the analogue of the tickler file, a staple of paper-based GTD implementations.) And Someday/Maybe is a place where I put stuff that I “maybe” want to do “someday” but which isn’t actionable right now.
The NEXT and PROJECTS areas hold the vast majority of my tasks. Both of these are containers for a bunch of projects housed inside them, and in each of those project are tasks that I decide are actionable when I do my processing. First, here’s NEXT:
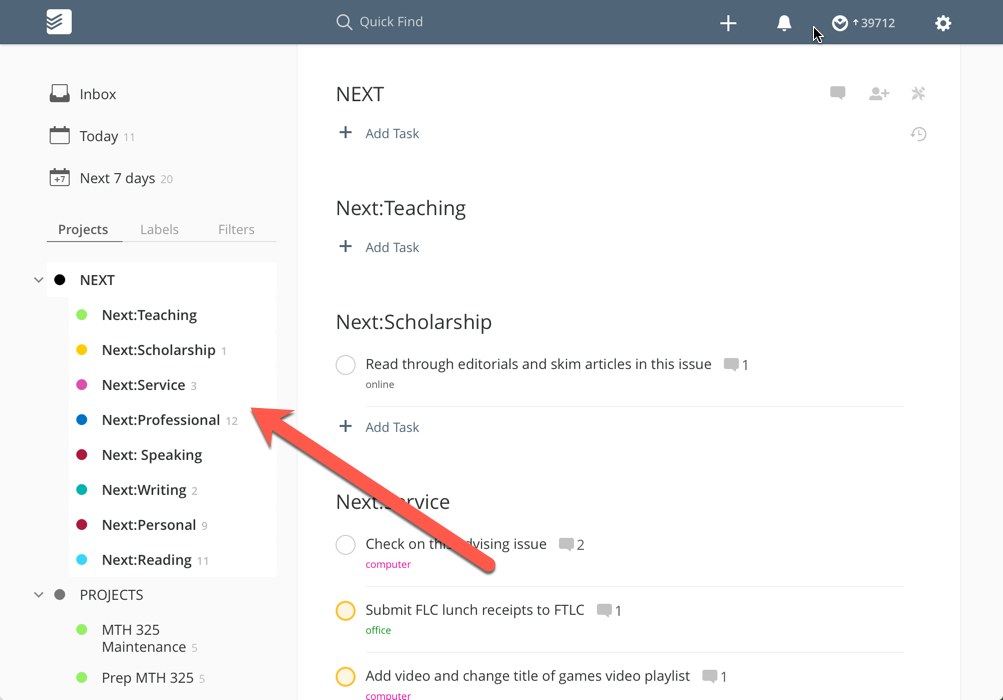
Tasks inside NEXT are “stand-alone” tasks like “Add editorial board information to the CV” or “Schedule kids’ passport appointment”. Although these don’t belong to a particular project, they do fall into distinct categories in terms of my life commitments. Those are the categories you see listed: Teaching, Scholarship, Service, Professional, Speaking, Writing, Personal, and Reading. Adding info to my CV is a Professional task, for instance; scheduling my kids’ passport appointments is a Personal task.
The reason I have those categories set up is because it forces me to process my actions in terms of the bigger picture. When I collect something and then process it, and decide it’s actionable, I have to stop and think about where it fits in my life. By extension I have to think about whether I should be doing that thing at all if there’s no clear answer to the question of where it fits. This extra step adds friction to the system, but it’s a big help in keeping my day-to-day work connected to the larger context of work-life balance.
Below NEXT is PROJECTS, which is a container for all my actual projects:
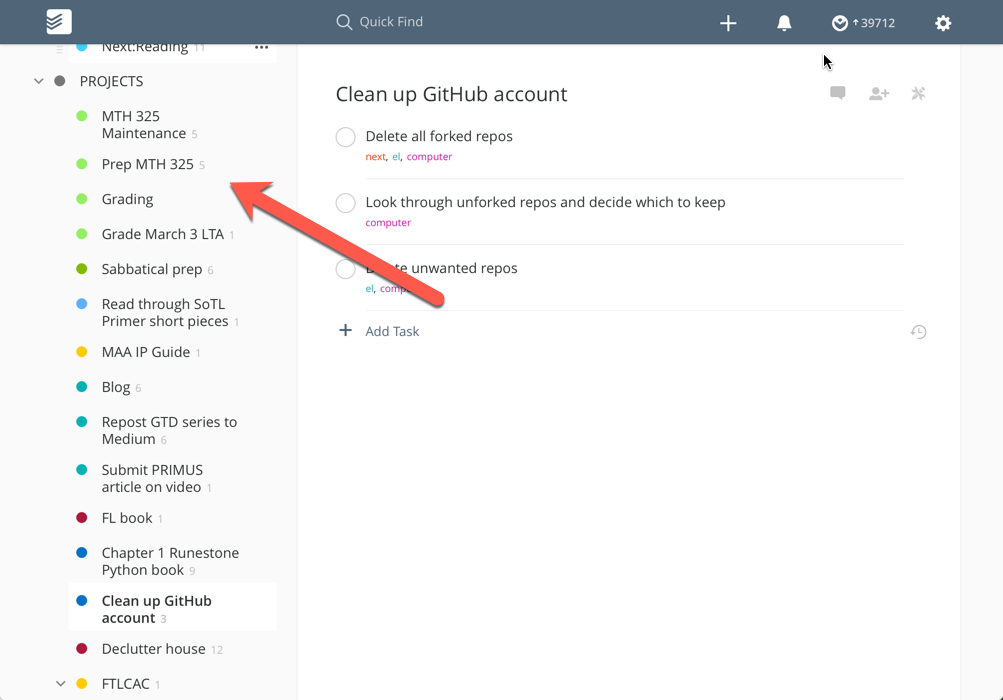
And each of these projects contains a list of tasks associated with those projects, like this one:
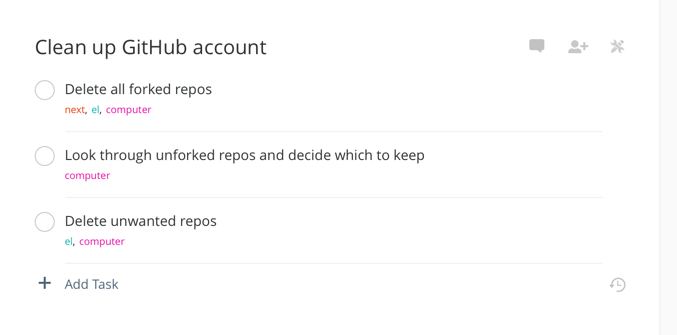
A person getting started using ToDoist could just leave it at that – projects that contain tasks. I go a few steps further by adding extra data to those tasks.
First there labels. The labels I use the most are:
| Label | What it’s for |
|---|---|
@next |
Designates the “next action” that needs to be taken on each project |
@el |
(“energy low”) Tasks that can be done with low energy |
@eh |
(“energy high”) Tasks that require high energy |
@ts |
(“time short”) Tasks that can be done in 2–5 minutes |
@tl |
(“time long”) Tasks that take more than 45 minutes |
@email |
Tasks that involve sending email |
@campus |
Tasks that can only be done on campus |
@office |
Tasks that can only be done at my office |
@home |
Tasks that can only be done at home |
I have a handful of lesser-used labels like @phone for tasks that involve phone calls. But I use these so infrequently I’m gradually starting to phase them out to keep the labels as few as necessary. In fact the vast majority of my tasks only use a combination of the first five labels above – denoting only whether an action is a “next action” and what sort of time and energy requirements it has. And I only take the time and energy requirements that are on the extreme ends; I used to have labels for “medium-time” and “medium-energy” but now I just assume that anything that isn’t on the high or low end is medium. Many tasks have no labels at all because they have no special requirements for time, energy, location, or tools.
Many of my tasks use priority levels as well. Priority 1 (red) indicates an MIT. Priority 2 (orange) is for tasks that are not MIT’s but which are high priority. Priority 3 (yellow) is for stuff that needs my attention. Priority 4 (white) is everything else.
All of these task items and the metadata they carry are entered into ToDoist when I process. The workflow goes like this: Once I decide an item in my inbox is actionable:
- Enter it into ToDoist (unless it’s really a project and not a single task)
- Add labels for time, energy, next action, etc. if it needs any
- Add priority level if it needs one
- Add a due date if it has one
- Move the task to an appropriate project or one of the life-areas in the NEXT project.
I just loop through this process one task at a time until the inbox is clear. ToDoist makes this very easy through an ingenious implementation of natural-language processing. Here’s how that works.
For example, this morning I remembered that I need to book a flight for an upcoming speaking engagement in Spain. Like a good GTDer, I captured that thought immediately rather than try to remember it. I know what the task is (“Book flight to Spain”). I figure this will take about 15 minutes, but I need to have my full attention on the task so I consider it high-energy. It’s not urgent, but needs attention (to prevent it from becoming urgent) so I estimate that’s a priority level 3. Moreover, the host institution told me they need to have that by March 12. Also there’s no particular place I need to be and no particular tool that I need (other than my computer, which is always with me). And it belongs in the project “UBC talk” (UBC = initials of the university that’s hosting me). I also happen to know this is not the next action to take on this project.
All of this mental processing takes me about 5 seconds. Entering the task into ToDoist with all that info doesn’t take much longer:

And that’s that. The task is now in the system, in its appropriate place with all the metadata I need, and out of my brain and inbox. (This was using the Quick Add feature; it’s just about as fast and frictionless if you enter it in the app.)
If you have an email inbox that’s sitting at 300+ emails right now, like a lot of professors, do the math for a second. Assume that half of those emails do not contain actionable tasks, so they’ll be either deleted or filed away — at any rate, they are easy to remove from the inbox. If you spend 1 minute on each of the remaining tasks doing mental processing and then sending them into ToDoist like I just described — and that’s probably an overestimate of how much time it takes — you can get your entire inbox zeroed out in less than 3 hours. One dedicated Saturday, or a day during spring or summer break, can be enough to get you out of email hell once and for all. It’s totally doable for anybody with a simple, trusted system.
Using the setup
I’ve added structure to my ToDoist setup that isn’t strictly necessary, with all the labels and priority levels and so on. Beginners probably shouldn’t use that level of structure when they are getting started. But where all of this structure pays off, once you’re comfortable with it, is when you start using ToDoist’s search capabilities.
Remember in this post we posed a bunch of scenarios professors encounter and asked, In each case, what could I be doing, what should I be doing, and what should I not be doing? Using ToDoist’s search capabilities, we can query our tasks lists and get a custom-made menu of next actions that are perfectly suited to the situation.
For example: It’s 8:45am on a Monday. My three-hour block of teaching starts in 15 minutes (and the classroom is across the hall). I have plenty of energy but not much time. What could I be doing in this situation? To find out, I just open ToDoist and ask it to show me all the tasks that are short in time duration. I can do that by typing @ts into the search field and I get:

This happens to be the only short-time task I have right now. So this is is a perfect fit; I need to get it done anyway, and it’s the right thing to be working on given the moment I’m in.
Or, suppose that I’m entering into a block of time I set aside for working on my MTH 325 class I’m teaching right now. I’m feeling high-energy and I want to focus on the highest-priority MTH 325-related tasks (say, level 1 or level 2), or those tasks that are due within the next week. What should I be doing? I can ask ToDoist by entering the search: (p1 | p2 | 7 days) & #325 (which in English would read: “priority 1, or priority 2, or due within 7 days; and the project name contains the string 325”):
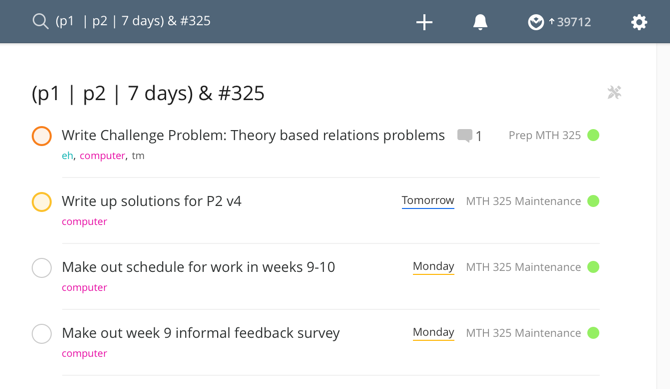
And just like that, out of hundreds of tasks that I need to get done, I have a short menu of four tasks that I should be working on because they fit the moment. I can just pick whichever one off of this menu that I want to do the most.
I cannot overstate how awesome and crucial it is that I can slice my task lists according to priority, context, time required, energy level, project group, due date, tool availability and so on. It’s like having a superpower. You can cut a massive list of tasks down to a very short list, all of which are equally perfectly suited to the moment — then just pick the one you want the most.
I also have a few filters set up, which are just saved searches that I can do with one click:
- next actions (
(p:NEXT) | @next) which gives me a master list of all next actions, both the ones that belong to projects and the ones in the disaggregated NEXT area. When I need to get something done but don’t have a search criterion, I just pull up this list and pick one thing off of it to do. - MIT’s (
p1). This returns a list of all priority 1 tasks. - Quick (
(@next | p:NEXT) & @ts). Returns a list of all next actions that take less than 5 minutes. - Brainless (
@el & (@next | p:NEXT)). Returns a list of all low-energy next actions, perfect for those times when I’m tired out and can’t think straight. Even if I’m wiped out, I can still find something to do, like moving a stack of papers from one place to another or deleting a GitHub repository. The capability of GTD to allow me to be productive even when I am in a zombie-like state was what originally sold me on this philosophy, back around 2004 when my wife and I started having kids and sleep was, to put it mildly, elusive.
Conclusion
GTD is not about tools but about behavioral change. There are habits that have to be developed before any productivity system or philosophy has a chance of gaining traction. But, good tools do support good habits, and help them to become more, well, habitual. “Good” tools are the ones you actually use, and with GTD it’s important to pick simple tools that work like the air conditioning and heating in your house — they make life better and you don’t think about them unless they break, which shouldn’t be often.
A companion post I’ll put up later will talk about Evernote which is the other part of my system. Stay tuned for that in the next few days.
My personal challenge to you: This week, keep working on those first four habits, and scout out tools that you like and that you could use to support them. Tell us about those in the comments and how you plan to use them.
Image credit: https://www.flickr.com/photos/thomasclaveirole/

Leave a Comment